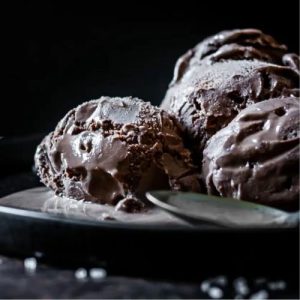
Salted Chocolate Ice Cream
This smooth, creamy salted chocolate ice cream blends rich cocoa, real chocolate, and a hint of sea salt for a perfectly balanced flavor. Quick to prepare and perfect for freezer storage, it’s a luxurious dessert that’s surprisingly simple to make at home.
Equipment
- 1 medium saucepan
- 1 Whisk
- 1 medium mixing bowl
- 1 sieve
- 1 ice cream maker
- 1 spatula
- 1 9x9 baking pan (or similar shallow pan)
Ingredients
- 1 cup whole milk
- ½ cup granulated sugar
- 2 cups heavy cream divided
- 1 tablespoon sea salt preferably fleur de sel
- 5 large egg yolks
- ½ cup unsweetened cocoa powder
- 6 ounces semi-sweet or bittersweet chocolate chopped
- 1 tablespoon vanilla extract
Instructions
- Warm the Milk Mixture: In a medium saucepan, combine 1 cup of whole milk, ½ cup granulated sugar, 1 tablespoon of sea salt, and 1 cup of heavy cream. Place the pan over medium heat and gently stir until the sugar is completely dissolved. Keep a close eye on the mixture and continue cooking until it reaches a bare simmer—tiny bubbles should form along the edges, but do not let it boil. This careful heating ensures the sugar fully dissolves and the flavors start melding together.
- Incorporate Cocoa and Chocolate: Once the milk mixture is warm, remove the pan from heat. Gradually whisk in ½ cup unsweetened cocoa powder until fully blended and no lumps remain. Then add 6 ounces of chopped semi-sweet or bittersweet chocolate, whisking continuously until the chocolate is completely melted and the mixture is silky smooth. This step creates a rich, velvety chocolate base that is the heart of the ice cream.
- Prepare the Egg Yolks: While the chocolate mixture cools slightly, place 5 large egg yolks in a medium mixing bowl. Use a whisk to lightly beat the yolks until they are smooth and slightly pale. This step helps the yolks incorporate evenly into the hot chocolate mixture, preventing curdling.
- Temper the Eggs: Slowly pour a small amount of the hot chocolate mixture into the egg yolks while whisking vigorously. Continue adding the chocolate mixture gradually, a little at a time, whisking constantly. This process, called tempering, warms the eggs gently and prevents them from scrambling. Once all the chocolate mixture is fully combined with the yolks, you will have a rich, smooth custard base.
- Cook the Custard: Return the combined mixture to the saucepan and place over medium-low heat. Stir continuously with a whisk or heat-resistant spatula, scraping the bottom and sides of the pan as you go. Cook until the custard thickens enough to coat the back of a spoon or spatula. Be careful—do not let it boil, as high heat can curdle the custard. This slow cooking step ensures a silky, creamy texture in the final ice cream.
- Strain for Smoothness: Once thickened, pour the custard through a fine sieve or strainer into a clean bowl. This step removes any lumps or coagulated bits, resulting in an ultra-smooth ice cream base.
- Add Remaining Cream and Flavor: Stir in the remaining 1 cup of heavy cream to lighten the mixture and enhance creaminess. Then add 1 tablespoon of vanilla extract for a subtle, aromatic flavor. Mix until everything is fully incorporated.
- Chill the Custard: Cover the bowl with plastic wrap or a lid and refrigerate for at least 4 hours, preferably overnight. Chilling the mixture allows it to thicken further and ensures your ice cream will churn smoothly with the perfect texture.
- Churn the Ice Cream: Once the custard is thoroughly chilled, pour it into your ice cream maker and follow the manufacturer’s instructions to churn. This process incorporates air into the custard, creating a light, creamy texture while freezing it evenly.
- Freeze in Pan: After churning, transfer the ice cream into a shallow 9x9 baking pan (or similar). Spread it evenly with a spatula, ensuring it’s not too tall, which allows it to freeze properly. Cover with plastic wrap or a lid and place in the freezer for at least 1 hour to set.
- Serve and Enjoy: When ready to enjoy, remove the ice cream from the freezer and scoop into bowls or cones. The salted chocolate flavor is rich, indulgent, and perfectly balanced, with a creamy, smooth texture that melts in your mouth. For added flair, sprinkle a tiny pinch of sea salt on top or drizzle with melted chocolate.
Notes
- Use high-quality chocolate for the best flavor; semi-sweet or bittersweet works perfectly.
- Choose a good sea salt like fleur de sel instead of regular table salt for depth of flavor.
- Temper the eggs slowly by adding the chocolate mixture gradually to prevent scrambling.
- Stir the custard constantly while cooking to achieve a smooth, silky texture.
- Strain the custard before chilling to remove any lumps or coagulated bits.
- Refrigerate the mixture for several hours or overnight for enhanced flavor and better texture.
- Use a shallow pan when freezing to ensure even setting and easier scooping.
- Avoid over-churning in the ice cream maker to prevent a dense texture.
- Allow slightly hardened ice cream to sit a few minutes at room temperature before scooping.
- Customize with toppings like nuts, chocolate shavings, or berries for added texture and flavor.