
Indulge in the ultimate chocolate lover’s treat with these gooey Triple Chocolate Brownies.
Made with a blend of dark, milk, and white chocolate, each bite delivers rich flavor and melt-in-your-mouth texture.
While delightfully decadent, this recipe also provides a boost of antioxidants from dark chocolate and contains moderate fiber from cocoa.
Quick to prepare and perfect for everyday baking, they’re ideal for satisfying cravings, sharing, or prepping ahead for sweet moments anytime.
Triple Chocolate Brownie
Equipment
- 1 × 9-inch square baking pan
- 1 × Large mixing bowl
- 1 × heatproof bowl
- 1 × whisk or stand mixer
- 1 × Spatula
- 1 × fine sieve (for flour and cocoa)
- Parchment paper (for lining)
Ingredients
- 200 g dark chocolate 70%+ cocoa content, chopped
- 200 g unsalted butter
- 3 large eggs or 4 medium
- 275 g caster sugar
- 100 g plain flour
- 50 g cocoa powder
- 100 g white chocolate chips or chunks
- 100 g milk chocolate chips or chunks
- 100 g dark chocolate chips or chunks
Instructions
- Preheat Oven and Prepare Pan: Preheat your oven to 180°C (350°F), or 160°C for fan ovens. Proper preheating ensures even baking and prevents undercooked centers.Line a 9-inch square baking pan with parchment paper, leaving about 2–3 inches hanging over two sides for easy removal later.Lightly grease the parchment with butter or a non-stick spray to prevent sticking.Set the pan aside while you prepare the batter.
- Melt Butter and Dark Chocolate: Chop 200 g dark chocolate (70%+ cocoa) into small pieces for easier melting.Place chocolate and 200 g unsalted butter into a heatproof bowl.Melt using double boiler method: set the bowl over a pot of simmering water, stirring occasionally until smooth.Or melt using microwave: heat in 20–30 second bursts, stirring between each interval until fully melted and glossy.Allow the chocolate mixture to cool to room temperature before combining with eggs to avoid scrambling.
- Whip Eggs and Sugar: In a large mixing bowl, combine 3 large eggs (or 4 medium) with 275 g caster sugar.Use an electric hand whisk or stand mixer and beat on medium-high speed for 3–5 minutes.The mixture should double in volume, turn pale, and become thick and mousse-like.Test: lift the whisk—if the mixture leaves a ribbon that lingers for a few seconds, it’s ready.
- Fold in Melted Chocolate: Pour the cooled chocolate and butter mixture over the whipped eggs and sugar.Using a rubber spatula, gently fold the chocolate into the egg mixture in slow figure-eight motions.Be patient—fold until fully combined. Avoid over-mixing to preserve the airy texture.
- Sift and Fold in Dry Ingredients: Sift together 100 g plain flour and 50 g cocoa powder over the chocolate mixture to remove lumps.Gently fold in with the spatula until just combined—no streaks of flour should remain.Avoid vigorous stirring to maintain the light, airy texture created by whisking eggs and sugar.
- Incorporate Chocolate Chips: Add 100 g white chocolate, 100 g milk chocolate, and 100 g dark chocolate chips/chunks.Fold them gently through the batter so they’re evenly distributed.
- Transfer Batter to Pan: Pour the batter into the prepared pan.Use the back of a spoon or spatula to spread the batter evenly, smoothing the top.Tap the pan lightly on the counter to remove any large air bubbles.
- Bake the Brownies: Place the pan on the middle rack of the preheated oven.Bake for 25–30 minutes, checking around 25 minutes.Check doneness: edges should be set, top slightly crackled, and center slightly wobbly. A toothpick inserted in the middle should come out with a few moist crumbs.If edges brown too quickly, loosely cover with foil.
- Cool Completely Before Slicing: Remove the pan from the oven and allow brownies to cool completely in the pan.Use the parchment overhang to lift the brownies out of the pan.Optional: chill in the fridge for 30–60 minutes for cleaner, firmer slices.
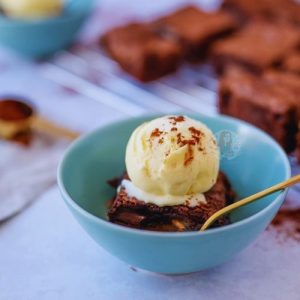
- Slice and Serve: Use a sharp knife, wiping it clean between cuts, to slice into 16 equal squares.Serve as-is, warm with ice cream, or drizzle with chocolate or caramel sauce.Store leftovers in an airtight container at room temperature or refrigerate for a firmer texture.
Notes
- Use good-quality dark chocolate (70%+ cocoa) for the richest flavor.
- Allow the melted chocolate mixture to cool before combining with eggs.
- Whisk eggs and sugar thoroughly for a mousse-like base.
- Gently fold ingredients to avoid losing air.
- Bake until edges are set and center is slightly wobbly.
- Cool completely before slicing for neat squares.
- For cleaner cuts, chill the brownies before slicing.
- Add a sprinkle of sea salt on top for a gourmet touch.
- Store brownies in an airtight container to keep them moist.
- Recipe yields about 16 pieces depending on slice size.
Chef’s Secrets for Perfect Brownies
The secret to brownies that strike the right balance between fudgy and chewy lies in the mixing technique.
When whisking the eggs and sugar, make sure the mixture becomes pale, thick, and airy—this creates the foundation of the texture.
Folding in the chocolate mixture slowly ensures the air isn’t knocked out, which helps the brownies set beautifully without being dense.
Another trick is to slightly underbake them rather than overbake; brownies continue to cook as they cool, so pulling them out when the center is just set guarantees that gooey, indulgent finish.
Finally, using high-quality chocolate makes a world of difference—the better the chocolate, the richer the flavor.
Serving Suggestions to Elevate Flavor
These brownies are delicious on their own, but they can be elevated into an impressive dessert with a few simple additions.
For a classic pairing, serve warm brownies with a scoop of vanilla or salted caramel ice cream—the contrast of hot and cold is irresistible.
Drizzle with chocolate sauce or salted caramel for an extra decadent touch.
If you’d like a lighter option, pair them with fresh berries such as raspberries or strawberries, which cut through the richness.
For an elegant presentation, dust the brownies with cocoa powder or icing sugar just before serving.
They’re also a perfect companion to a cup of coffee or a glass of cold milk, making them suitable for everything from casual snacking to special occasions.
Storage Tips for Freshness and Flavor
Once cooled, these brownies can be stored in an airtight container at room temperature for up to five days.
To maintain their soft, fudgy texture, line the container with parchment paper and place a piece between each layer of brownies to prevent sticking.
If you prefer them slightly chilled and firmer, refrigerate for up to one week—they’ll become even denser and chewier.
For long-term storage, brownies freeze beautifully. Wrap individual slices tightly in plastic wrap, then place them in a freezer-safe bag or container for up to three months.
To enjoy, simply thaw at room temperature or warm gently in the microwave for that fresh-from-the-oven taste.
Frequently Asked Questions
1. Can I make these brownies gluten-free?
Yes! Simply swap the plain flour with a gluten-free all-purpose flour blend. Look for one that already contains xanthan gum for best results. The brownies may turn out slightly softer, but the flavor will be just as rich.
2. How do I make the brownies more fudgy or cakey?
For extra fudgy brownies, reduce the baking time by 2–3 minutes and ensure you don’t over-whisk the eggs. For a slightly more cake-like texture, whisk the eggs and sugar longer and bake a few minutes longer until the center is more set.
3. Can I use only one type of chocolate?
Absolutely! While the recipe calls for three types for variety, you can stick to dark chocolate for a more intense flavor, or just milk chocolate for sweetness. Adjust according to your personal taste preferences.
4. Why are my brownies sinking in the middle?
Brownies often sink if they are underbaked or if the egg and sugar mixture wasn’t whisked enough to build volume. Make sure to whisk until thick and airy, and allow the brownies to cool fully in the pan before slicing to help them set properly.
5. Can I double the recipe for a larger crowd?
Yes, the recipe doubles very well. Use a larger rectangular baking dish (such as 9×13 inches) and increase the baking time slightly, checking at around 35–40 minutes. The same cues apply: firm edges, a slightly wobbly center, and a toothpick with moist crumbs are your signs they’re ready.