
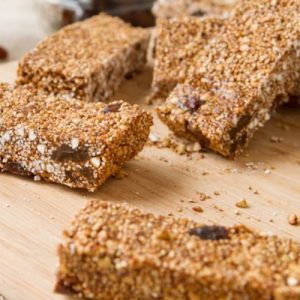
These No-Bake Cinnamon Raisin Granola Bars are a wholesome, allergy-friendly snack made without oats, nuts, or refined sugar.
Packed with plant-based protein from buckwheat and sunflower seed butter, along with fiber-rich puffed grains and flaxseeds, they provide lasting energy without heavy fats.
Naturally sweetened and full of warm cinnamon flavor, these bars are quick to prepare, great for meal prep, and perfect for everyday snacking on the go.
Wholesome Cinnamon Raisin Granola Bars
Equipment
- 1 × 13×9 inch baking pan
- 1 × Large mixing bowl
- 1 × Medium saucepan
- 1 × Spatula
- 1 × Measuring cups and spoons
Ingredients
- 2 ⅓ cups puffed amaranth puffed millet, or puffed quinoa
- 1 cup raw buckwheat groats untoasted
- ½ cup raisins
- 2 tablespoons ground flaxseed
- 2 tablespoons ground cinnamon
- ½ cup coconut nectar or similar liquid sweetener
- ½ cup sunflower seed butter store-bought or homemade
Instructions
- Prepare the Pan: Lightly grease a 13×9 inch baking pan with a small amount of coconut oil. You don’t need much—just enough to keep the mixture from sticking. Spread the oil evenly across the bottom and along the sides using a pastry brush, paper towel, or even clean fingertips. Once greased, set the pan aside. Preparing the pan first makes the later steps faster and ensures your granola bars set properly.
- Mix the Dry Ingredients: In a large mixing bowl, combine the puffed grains (amaranth, millet, or quinoa), raw buckwheat groats, raisins, ground flaxseed, and ground cinnamon. Use a large spoon or spatula to toss everything together until the ingredients are evenly distributed. This step is important to ensure every bite has the perfect balance of chewy raisins, light puffed grains, and warm cinnamon flavor.
- Heat the Binding Mixture: Place a medium-sized saucepan on the stove and add the coconut nectar and sunflower seed butter. Turn the heat to medium and stir continuously with a spatula or wooden spoon. As the mixture warms up, it will start to blend into a thick, glossy syrup. Keep stirring until small bubbles form across the surface—this should take about 2–3 minutes. Once bubbling, allow it to cook for an additional 2 minutes while stirring constantly to prevent scorching. This step is key because it creates the sticky base that holds your bars together.
- Combine Wet and Dry Mixtures: Carefully pour the hot sunflower butter mixture over the bowl of dry ingredients. Immediately begin mixing with a sturdy spoon or spatula, making sure the liquid coats all of the grains, raisins, and seeds. Rotate the mixture from the bottom up, pressing and folding until no dry pockets remain. This step may require a little arm strength, but the more evenly everything is combined, the better your bars will hold their shape.
- Press Mixture into Pan: Transfer the sticky granola mixture into your prepared baking pan. Using the back of a spatula or clean, slightly damp hands, press the mixture down firmly and evenly into the pan. Apply as much pressure as possible—the tighter you press, the denser and sturdier the bars will be once set. Pay special attention to the corners and edges so they don’t end up thinner than the middle.
- Chill to Set: Place the pan in the refrigerator for at least 1 hour to allow the bars to firm up completely. This cooling period is essential because it helps the coconut nectar and sunflower seed butter solidify, binding all the ingredients together. If you’re in a rush, you can speed things up slightly by placing the pan in the freezer for about 25–30 minutes, but chilling in the fridge gives the best texture.
- Slice and Serve: After chilling, remove the pan from the refrigerator. Use a sharp knife to cut the mixture into 16 evenly sized bars (or smaller bite-sized squares if you prefer). Lift them carefully from the pan and place them on a serving plate. These bars can be eaten straight from the fridge for a firm, chewy texture or served at room temperature for a softer bite.
- Store for Freshness: Any leftover bars should be stored in an airtight container in the refrigerator, where they will stay fresh for up to 2 weeks. If stacking them, place parchment paper between layers to prevent sticking. These bars also hold up well in lunchboxes or travel containers, making them perfect for grab-and-go snacks, meal prep, or healthy dessert alternatives.
Notes
- Press firmly: The harder you press the mixture into the pan, the better the bars will hold together.
- Sweetener swaps: Coconut nectar works best, but you can substitute with brown rice syrup or maple syrup for a slightly different flavor and texture.
- Nut-free guarantee: Sunflower seed butter keeps this recipe safe for nut allergies, but pumpkin seed butter can also be used.
- Texture balance: Puffed grains keep the bars light, while buckwheat groats add crunch—don’t skip either for the best bite.
- Make-ahead friendly: These bars last up to 2 weeks in the fridge, making them perfect for meal prep.
Chef’s Secrets for Perfect Granola Bars
The secret to getting these no-bake granola bars just right lies in two key steps: the binding mixture and the pressing technique.
When heating the sunflower seed butter and coconut nectar, make sure to stir constantly and let it bubble for just a couple of minutes—this creates a sticky syrup that acts as glue.
If it’s undercooked, the bars may crumble; if overcooked, the mixture may harden too much.
Equally important is pressing the mixture firmly into the pan.
Use the back of a spatula or even lightly oiled hands, and apply steady pressure across the entire surface.
This ensures the bars set into dense, chewy slices rather than falling apart. Lastly, be patient with the chilling time—allowing the bars to fully set in the fridge guarantees clean cuts and perfect texture.
Serving Suggestions for Every Occasion
These cinnamon raisin granola bars are versatile enough to enjoy at any time of day.
For a quick breakfast, pair them with a smoothie or a cup of coffee for a balanced start.
They also make excellent pre- or post-workout snacks since the combination of natural sugars, fiber, and plant-based protein provides steady energy without a crash.
For kids, they’re a lunchbox-friendly treat that’s both wholesome and allergy-safe.
You can also crumble one over yogurt or dairy-free ice cream for a crunchy topping.
If you’re entertaining, cut them into smaller squares and serve as bite-sized nibbles alongside a fruit platter or warm tea.
Storage Tips to Keep Them Fresh
Since these bars are made without preservatives, proper storage is essential for maintaining their flavor and texture.
The best option is to store them in an airtight container in the refrigerator, where they will stay fresh for up to two weeks.
If you plan to stack them, place a sheet of parchment paper between each layer to prevent sticking.
For longer storage, you can freeze the bars individually wrapped in parchment or plastic wrap and then sealed in a freezer bag.
They’ll keep well for up to two months—just thaw them in the fridge overnight or at room temperature for about 20 minutes before serving.
Frequently Asked Questions
1. Can I replace sunflower seed butter with peanut butter?
Yes, you can use peanut or almond butter if you don’t need the recipe to be nut-free. The flavor will change slightly, but the texture will remain the same.
2. What can I use instead of coconut nectar?
Brown rice syrup is the closest substitute because of its stickiness. Maple syrup or agave can also work, but the bars may be slightly softer and less firm.
3. Do I have to use puffed grains?
Yes, puffed grains are essential for giving the bars a light and chewy texture. If unavailable, you can substitute puffed rice cereal, though it won’t be quite as nutrient-dense.
4. Why are my bars falling apart?
This usually happens if the syrup mixture wasn’t cooked long enough or if the mixture wasn’t pressed firmly into the pan. Make sure to cook the binder until bubbling and apply firm, even pressure when setting the bars.
5. Can I make these bars ahead for meal prep?
Absolutely! These bars are meal-prep friendly and can be made in advance. Store them in the fridge for up to two weeks, or freeze them for up to two months. They’re a perfect grab-and-go snack for busy days.