
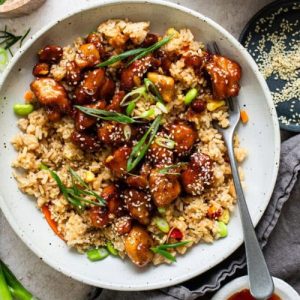
This crispy honey garlic chicken is a flavorful, fuss-free dish that combines tender chicken with a sticky-sweet garlic sauce for an irresistible weeknight meal.
Packed with lean protein and made with wholesome ingredients, it’s a balanced option that’s naturally low in carbs and high in satisfaction.
Quick to prepare, family-friendly, and perfect for meal prep, it delivers takeout-style comfort without the heaviness—making it an everyday favorite.
30-Minute Honey Garlic Chicken
Equipment
- 1 large resealable bag or bowl (for marinating)
- 1 large nonstick skillet or frying pan
- 1 spatula or wooden spoon
- 1 slotted spoon/tongs
- 1 sharp knife
- 1 cutting board
- 2 mixing bowls
Ingredients
- 2 lbs boneless skinless chicken thighs, cut into bite-sized pieces
- Kosher salt to taste
- Freshly ground black pepper to taste
- 2 teaspoons garlic powder
- 1 teaspoon onion powder
- 1 teaspoon smoked paprika
- 1 teaspoon sesame oil
- ¼ cup cornstarch
- 2 –3 tablespoons vegetable oil for frying
- ½ cup honey
- ¼ cup sweet chili sauce
- ¼ cup soy sauce
- 10 cloves garlic chopped (not minced)
- Cooked hibachi-style rice sesame seeds, chopped scallions
Instructions
- Prepare and Season the Chicken: Begin by cutting the boneless, skinless chicken thighs into bite-sized chunks. This ensures the chicken cooks evenly and develops a crispy exterior. Place the chicken pieces into a large resealable bag or a mixing bowl. Season generously with kosher salt and freshly cracked black pepper, followed by garlic powder, onion powder, smoked paprika, and sesame oil. Seal the bag or mix well until all pieces are evenly coated with the seasoning. This seasoning step not only enhances flavor but also lays the foundation for the bold honey-garlic sauce.
- Marinate for Best Flavor: Allow the seasoned chicken to rest in the refrigerator for at least 1 hour. This marination period helps the spices deeply penetrate the meat, resulting in more flavorful and juicy bites. If time allows, marinate overnight for maximum depth of flavor. For busy weeknights, even a short 30–45 minutes of marination will still deliver great results.
- Coat the Chicken with Cornstarch: When you’re ready to cook, sprinkle cornstarch evenly over the marinated chicken pieces. Toss or shake until every piece is fully coated. The cornstarch forms a light crust that crisps up beautifully during pan-frying while keeping the inside moist and tender. After coating, let the chicken rest at room temperature for about 20 minutes. This prevents uneven cooking and ensures the oil doesn’t cool down too quickly when the chicken is added.
- Heat Oil and Prepare for Frying: Place a large nonstick skillet over medium-high heat and add 2 tablespoons of vegetable oil. Allow the oil to heat until shimmering but not smoking—this usually takes 1–2 minutes. Having the oil at the right temperature ensures the chicken sears immediately, locking in juices and preventing a soggy crust. Keep a paper-lined plate or tray nearby to hold the fried chicken pieces as you work in batches.
- Pan-Fry the Chicken in Batches: Working in small batches, carefully add chicken pieces to the hot skillet without overcrowding (overcrowding lowers the oil temperature and prevents crispiness). Fry the chicken for about 3–4 minutes on the first side, until golden brown and lightly crisp. Flip each piece and cook an additional 2–3 minutes until fully cooked through. Use a slotted spoon or tongs to transfer the chicken to the prepared plate. Repeat this process with the remaining chicken, adding a little more oil between batches if necessary. Once all chicken is browned, return everything back into the skillet.
- Build the Honey Garlic Sauce: Reduce the heat to medium. Pour in the honey, sweet chili sauce, and soy sauce directly into the skillet with the chicken. Add the chopped garlic cloves—leaving them in small chunks rather than mincing creates bursts of garlicky flavor in each bite. Using a wooden spoon or spatula, stir everything together to coat the chicken evenly in the sauce. Allow the mixture to simmer gently for 4–5 minutes, stirring occasionally. The sauce will thicken slightly and cling beautifully to the crispy chicken pieces.
- Simmer and Meld Flavors Together: As the sauce simmers, the honey caramelizes slightly, blending with the soy sauce’s saltiness, the tangy-sweet chili sauce, and the robust garlic. Keep stirring gently to ensure the chicken doesn’t stick and every piece is coated. Once the sauce reaches a glossy, slightly thick consistency, taste-test and adjust seasoning if desired. If you prefer more heat, a pinch of red chili flakes or a drizzle of sriracha can be added at this stage.
- Serve and Garnish Generously: Turn off the heat and immediately plate the honey garlic chicken while it’s hot and saucy. For a full takeout-inspired experience, serve it over hibachi-style fried rice, jasmine rice, or even steamed veggies. Sprinkle with toasted sesame seeds and freshly chopped scallions for a fresh pop of flavor and color. This garnish not only makes the dish look appetizing but also adds extra texture.
- Enjoy Right Away: This dish is best enjoyed immediately while the chicken is crispy and the sauce is warm and glossy. Every bite should deliver the perfect balance of crunch, sweetness, savory notes, and garlicky punch. Pair it with sides like stir-fried vegetables, mashed potatoes, or noodles for a complete meal that rivals your favorite takeout.
Notes
- Use boneless, skinless chicken thighs for the juiciest and most tender results.
- Marinating the chicken, even briefly, makes a noticeable difference in flavor.
- Resting the cornstarch-coated chicken before frying helps achieve crispiness.
- Fry in small batches to prevent overcrowding and soggy chicken.
- The sauce thickens as it simmers; don’t rush this step.
- Chopped garlic (not minced) gives bursts of bold flavor in the sauce.
- Adjust sweetness or heat by tweaking the honey or chili sauce amount.
- Garnish with sesame seeds and scallions for color and crunch.
- Best served hot and fresh while the chicken is still crispy.
- Leftovers can be repurposed into rice bowls or wraps.
Chef’s Secrets for Perfect Results
The secret to this dish lies in balancing texture and flavor.
Chicken thighs are chosen over breasts because they remain juicy during high-heat frying and hold up beautifully against the sticky sauce.
For crispiness, don’t skip the cornstarch coating—it’s the key to creating a light crust that absorbs the sauce without becoming soggy.
Another insider tip is letting the chicken rest at room temperature after dredging.
This ensures even frying and prevents the crust from peeling off.
Finally, don’t shy away from using freshly chopped garlic instead of jarred or minced—this small detail gives the sauce its signature punch and aroma.
Serving Suggestions and Pairing Ideas
This crispy honey garlic chicken is versatile and pairs well with a variety of sides.
For a takeout-inspired meal, serve it over hibachi-style fried rice or simple jasmine rice that soaks up the extra sauce.
If you’re craving something lighter, pair it with steamed vegetables like broccoli, bok choy, or snap peas to balance the richness.
For a fusion twist, try serving it in lettuce wraps or alongside mashed potatoes for a comforting East-meets-West combination.
Garnishing with scallions and sesame seeds elevates presentation, while a squeeze of lime juice adds brightness that cuts through the sweet-savory sauce.
Best Storage and Reheating Tips
Like most crispy-coated dishes, this chicken is best enjoyed fresh, but it can still be stored for later.
Place leftovers in an airtight container and refrigerate for up to 3 days. The sauce may thicken further as it chills, which is perfectly normal.
To reheat, use a skillet over medium heat and add a splash of water to loosen the sauce while gently warming the chicken.
Avoid microwaving if possible, as it softens the crispy coating.
If freezing, store cooked chicken (without sauce) separately for up to 2 months. Add freshly made sauce when reheating for best results.
Frequently Asked Questions
1. Can I use chicken breast instead of thighs?
Yes, chicken breast can be used, but it may turn out slightly less juicy. If using breast, be careful not to overcook, and consider cutting the pieces slightly larger to prevent them from drying out.
2. How do I make the sauce spicier?
To add extra heat, increase the amount of sweet chili sauce or stir in chili flakes, sriracha, or a dash of hot sauce while the sauce simmers. Adjust gradually so the spice doesn’t overpower the honey-garlic balance.
3. Can I make this recipe gluten-free?
Absolutely! Simply swap the soy sauce for tamari or a certified gluten-free soy alternative. The cornstarch coating is naturally gluten-free, so no changes are needed there.
4. What oil is best for frying the chicken?
Neutral oils with a high smoke point, like vegetable, canola, or sunflower oil, are ideal. Avoid olive oil since it can burn at high heat and affect the flavor of the chicken.
5. Can I prepare this dish ahead of time?
You can marinate the chicken up to a day in advance, which actually deepens the flavor. However, for the best texture, fry the chicken and prepare the sauce right before serving. If you need to save time, you can pre-chop the garlic and measure out the sauce ingredients ahead of cooking.